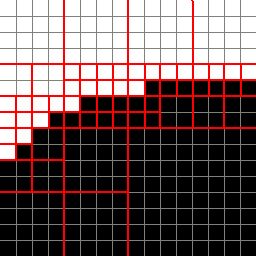
Figure 1 - Adaptive Subsampling Example
An Algorithm for Image Compression
Written By Thygrion / Youth Uprising
Introduction
Let's set the scene here: You're trying to code your first 64k intro. Things seem to be going fine. You have your engines, scenes, effects, music - everything's perfect. But then, looking at your checklist, near the bottom there's an unchecked box. Next to it just so happens to read "Compress and pack textures". So, you set out on compressing your images for your demo, but your LZW algorithm only makes them larger! What to do now?
This would be a good time to tell you all what this article is really going to be about. This article is intended to introduce you all to an image compression method I devised (although I'm pretty sure it's been done before - might even happen to be the wavelet method, I don't know :p), and to teach you how it works. It's not too difficult either, so yes, even you should be able to work with it. How hard can it be if a 14-year-old invented it ;) ?
Keep in mind that this is a lossy compression method, but I suppose in size-limited demos people won't really care.
The Algorithm
For this tutorial I'm going to assume this will be used for compressing 256x256 pixel textures. This can be changed very easily, but there are some things to remember when resizing, which will be explained later.
Basically, the format uses an adaptive subsampling system to save images, much like a JPEG image. How this works is the image is divided into squares. The size of these squares MUST be a power of 2 (4x4, 8x8, 16x16, etc). What the compressor does is go through each square in the image. For each square, the colors at each corner of the square is saved to the compressed file if those pixels haven't been saved yet. Then, the four corners' colors are compared to each other. If the colors are similar enough, the compressor moves on to the next square. Otherwise, this square is divided into four more squares, and the same thing is done for each new square until each one has close enough corners or is 1 pixel by 1 pixel in area. Figure 1 shows the subsampling of a black edge in an image:
Figure 1 - Adaptive Subsampling Example
As you can see, it starts with 8x8 squares. The image is traversed by two loops (For y = 0 To 256 - 8 Step 8 ... For x = 0 To 256 - 8 Step 8). For each iteration by the X loop a function is called to govern the square. This function looks at the colors of the corners of the square (squarex, squarey), (squarex + squaresize, squarey), (squarex, squarey + squaresize), and (squarex + squaresize,squarey + squaresize). If they are too different from each other the square size is divided by 2 and four more squares are checked.
When loading the compressed image, the exactly same process is done when saving the image, except for two things: 1, you're loading colors instead of saving colors of the image, and 2, when a square's dimensions are greater than 1x1 and the corners' colors are similar, you gouraud interpolate the colors of the square and fill it that way.
Now, there is a drawback - sometimes, like if the image is full of entirely different colors everywhere, the image may not get any smaller, although, unlike using an LZW method, the compressed image will never be larger than the original 24-bit bitmap. Really nothing to worry about.
Interpolation
When you load the images and interpolate the squares, you'll be using a standard square gouraud scheme. Nothing special, it's very easy to do. I'm assuming you know how this works so I won't go into detail.
Also if you're up to it you may want to try things like triangle-based interpolation and see if you end up with better quality results. I haven't tested this myself so I wouldn't know if it would or not.
Points to Remember
There are some things to keep in mind when writing a compressor such as this. You must always make sure that whenever you set the size of an image to compress, its width and height must be divisible by the initial square size. You must also be sure that your compressor and decompressor work the same way and have the same error levels and square sizes. This can be taken care of easily if you want different variables for each image - simply save them to the compressed file.
Results
Here are some sample images I've compiled to show how well this method works. On the left you'll see the original image, center you'll see the parameters of the compressor/decompressor, and on the right the compressed image.
| These results were very good I think: | ||
 192 KB | Square size: 8 Error level: 25 | 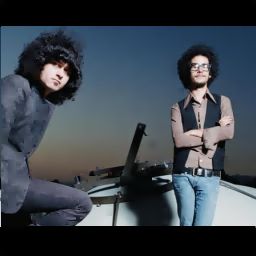 55.8 KB |
This one turned out horrid: | ||
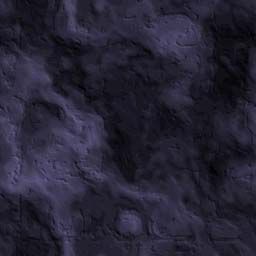 192 KB | Square size: 8 Error level: 25 | 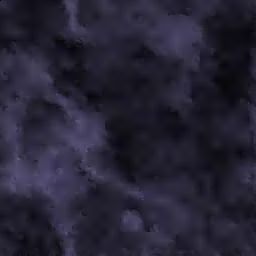 14.2 KB |
Don't turn up your error level too much, or this will happen: | ||
192 KB | Square size: 8 Error level: 255 |  3.9 KB |
This was good enough for me: | ||
 192 KB | Square size: 8 Error level: 15 |  55.3 KB |
Conclusion
So basically this is a pretty simple image format. All you do is some square subdivision and basic interpolation. Child's play. ;)
You can even get much better results if you have images with very close colors (i.e. a black texture with white text in the center).
Greetings and Thanks
Greetings:
My team, Youth Uprising (Waffle, Carpets, Markku)
My other team, Gravity (We change too often to know who's in :P)
White Noise, a good friend of mine and an aspiring programmer
Thanks:
The Joint Photographic Exports Group (JPEG) for inspiration
Kolor for inspiration
Lycium of Quixoft for a subsampling explanation in his RTRT tutorial